Sorry I'm just now getting around to updating. It pains me to have waited so long. A fair amount of progress has been made, but at the same time, several more large hurdles remain.
Cut to the Chase:
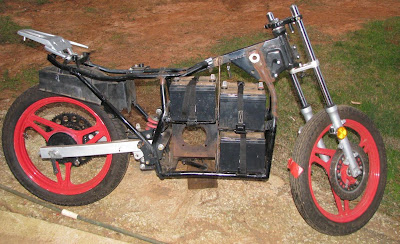
So here’s what we’ve got at this point. The bike’s frame is just about ready, as most of the alterations that remain are minor and aesthetic. The only big modification that is not complete is the gas tank area. The power train parts are ready. The battery trays are done and the motor mount as well.
The drive system is right at 99% done. As far as I know, we have everything, and we just haven’t hooked it all up yet. We went with a chain and sprocket system, mainly for how easily it can be tweaked. Additionally, the swing-arm won’t have to be removed to replace the chain as it would for a belt, plus the parts were readily available. We found a new rear sprocket locally somehow and dad came up with a creative way to mount it. Seeing as how the old rear sprocket had the exact bolt pattern for the hub and how the new rear sprocket had an extremely open center area, we just combined them. I am only slightly concerned about the strength and balance of the weld, but those can be slowly tested or measured and corrected as needed. For clarity, we’re using the old rear sprocket only for mounting the new one – there will be no shifting of gears or de-railing of the chain between gears, as the two sprockets are in the exact same three-dimensional plane on the axle.
Once a Fuel Tank:
As an experiment really, we covered the gas tank in plastic-wrap and then aluminum foil and covered it in Great Stuff – an expanding spray-on foam. This resulted in a form which matches the tank overall. Dad shaved / ground / sanded down the outside to give it a good external shape and we played around with ideas about mounting it, covering it in fiber-glass, and how much space it gave us to work with (a ton, internally). Here's what that looked like:

On a separate afternoon however, we got to looking at the original gas tank, how symmetrical it was, and its fair condition. An hour or so later, we’d cut the bottom off of it and had just a top shell like so many others modders have done. I wasn’t sure about if it would really work out or not, but as of this moment, it has more potential (in our minds) than the foam shell. It is of course very symmetric (which is pretty important to me) and without a bottom contoured around the backbone of the bike, the internal space should be ample.
Right now, the plan is something like this: Ease of access is important since several core components are going to be housed within the tank. We might try hinging the tank at the seat and simply providing a sturdy metal plate beneath the backbone to which the tank can be secured and potentially air-sealed. Within the tank, we’ll keep it simple I bet and use simple flat plate to which we can mount the battery chargers, main contactor, main breaker and d.c./d.c. converter. Whatever gauges, LEDs, and other indicators end up being used can either be wired up to a dash area or back-mounted and exposed directly through the tank itself.
Stay in the Light:
The headlight is a stubborn problem for me. I want it to be reliable, safe, unique, legal and as efficient as possible. Those are competing interests, it seems. I don’t know a ton about the various lighting technologies (LED, Halogen, and HID) but I want to keep the front of the bike distinctive, clean, and functional. Wikipedia yields the following:
- Halogens are prevalent and inexpensive, but require high power on average.
- HIDs are the brightest, somewhat efficient, have good longevity, but are expensive.
- LEDs are bright, very efficient, have superior longevity, but can be the most expensive.
My brother had this idea: It could be advantageous to have multiple technologies on the bike for different purposes. Yes, an all LED bike would be cool, but if it's not practical (not to mention legal), then it's just not. Anyway, a running-lamp could probably be LED and homemade without any legal or safety issues. Meanwhile, the actual headlight for actually lighting the road could be a halogen module that's DOT approved. I don't see myself riding much at night, but I guess it is bound to happen eventually, and I don't want to be pulled over for having too bright or dim a headlight, so I might just go this route. From what I've seen, it wouldn't be too difficult to build my own LED module. Keep in mind that the laws where you live might also have a lot to with what you feel comfortable doing.
Here are some links I stumbled across while trying to find either professionally manufactured (and DOT approved) LED headlights or how to make my own.
http://ecomodder.com/forum/showthread.php/led-headlight-6514.html
http://www.hebeiltd.com.cn/?p=zz.led.resistor.calculator
http://ledsupply.com/led-resource.php
http://www.mvlc.info/index.html
http://www.projectresponder.com/pse/d304-Solstice-Solo-10w-LED-Light-Euro.htm
http://www.candlepowerforums.com/vb/showthread.php?t=228933
Still to do:
The tank needs a sturdy hinge and secure point, and a way to seal it off. The seat needs to be trimmed and re-covered, and potentially hinged as well. A shelf needs to be made under the tank and the components fitted and mounted to that shelf. The headlight technology and hardware must be researched and a solution planned. New high-power wiring should be accounted for and purchased. Original wiring harness and connectors should be used where convenient. Any missing or broken parts on the bike need to be ordered.I'm already working on another post concerning motor controllers - what they do and how. I'm doing my best to get some facts straight and present all the material in a way that is easy to grasp. I'm learning an awful lot, so hopefully it will be of some help to others as well.
-Colby